 Single Faucet Kegerator Beer Dispensers
 Dual Faucet Two Tap Kegerators
 Triple Faucet Three Tap Kegerators
 Undercounter Built-In Kegerators
 Outdoor Kegerator Beer Dispensers
 ADA Kegerators
 Commercial Kegerators
 Mini Kegerators
 Home Brew Kegerators
 Carbonated Water Kegerators
 Cold Brew & Nitro Coffee Dispenser Kegerators
 15" Kegerators
 Panel Ready Kegerators
 Kombucha Equipment
 Guinness® Dispensing Kegerators
 Wine Kegerators
 Kegerator Cabinets
 Kegerator Covers and Accessories
 Kegerators
 Kegerator Conversion Kits
 Kegs & Keg Accessories
 Beer Faucets
 Beer Shanks
 Draft Beer Towers
 Keg Taps Couplers
 Regulators & Gas Equipment
 Beer & Gas Line Hose
 Co2 and Nitrogen Air Tanks
 Beer Line Cleaning Equipment
 Drip Trays
 System Fittings
 Jockey Boxes
 Keg Beer Party Pumps
 Glassware
 Guinness® Dispensing Equipment
 Remote Glycol Systems
 Wine Cooler Refrigerators
 Side by Side Wine Cellars
 Cooling Units
 Panel Ready Wine Refrigerators
 Beverage Centers
 Wine Racks
 Wine Dispensing Systems
 Wine Accessories
 Wine Making
 Nitro Hot Draft System
 Ready to Drink Bag-in-a-Box Coffee Dispensing Equipment
 Nitrogen Infusers
 Nitrogen Tanks & Generators
 Nitrogen Beer Regulators
 Nitro Cold Brew Coffee Kegs
 Cold Brewed Coffee Tools
 Cleaning Equipment
 Outdoor Appliances
 ADA Appliances
 Panel Ready Appliances
 Commercial Grade Appliances
 Refrigerators
 Drawer Refrigerators
 Ice Makers
 Water Dispensers & Accessories
 Freezers
 Home Brew Equipment Kits
 Fermentation Equipment
 Boiling and Mashing Equipment
 Home Brew Beer Kegs
 Home Brew Kegerator Conversion Kits
 Brewing Tools
 Home Brew Ingredients
 Cleaning Chemicals
 Test Equipment
 Home Brew Beer Bottles and Bottling Equipment
 Brewery Fittings
 Draft Beer Equipment
 Homebrewing Equipment
 Wine Equipment
 Luxury Appliances and Refrigeration
 Coffee Equipment
 Kombucha
 The Beverage Blog
 Frequently Asked Beer Questions
 Shop by Brand
 Shop by Category


Buying a grain mill might seem like a big decision, but it's definitely one that will pay off! While store-bought milled grain should be used within weeks of purchasing for maximum freshness, unmilled grain can last for months if stored properly. Buying grain in bulk and milling your own grain as needed is a great way to cut homebrew costs, and gives you even more control over the ingredients in your beer.
Before you get started, here are a few things you need to know about milling grain.
How It Works
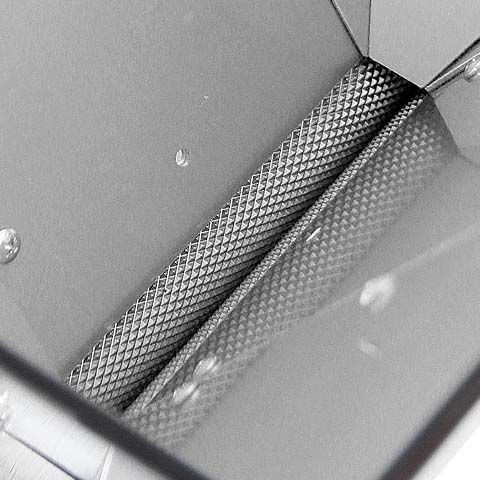
Grain mills utilize two or three metal rollers held parallel in a frame, which have a small enough space between them to prevent any grain from passing through the rollers uncrushed. You can adjust this gap to allow for a more coarse or fine finished product.
In order for your mash to be efficient, the grain must be physically crushed and broken apart into a ground meal called grist. You want the grist to be fine but not ground to flour, as that would make it difficult to separate the grain from the mash liquid when the mash is complete.
Ideally, your grain would be broken into enough pieces to allow each seed's contents to be extracted and converted into simpler compounds during the mash. You want the husks to be left as intact as possible so that you are squeezing the malt until it's crushed inside the husk. The unbroken husks keep the ground meal separated enough to allow flow through the grain bed.
If you're doing partial mashes of a few pounds of grain or if you're just steeping specialty grains to add flavor, aroma, and color, it isn't too important how the grain is milled. When brewing all-grain it is a much larger factor, as it can be very difficult to work with 10 pounds of grain if you can't get the mash to flow through it. Some commercial brewers add oat or rice husks to their mash to maintain a light and fluffy grain bed.
Choosing The Right Mill
You should select a grain mill that will treat the grain gently. When professional-sized mills are redesigned in a smaller size for homebrew use, they can sometimes lose some of their ability to pull in grain smoothly and crush it in stages. Try to avoid homebrew mills that automatically grind the grain too fine.
Other important factors to consider when choosing a homebrew grain mill are the roller size and materials and the bearing materials. Depending on how much grain you will be milling, you may want to select a mill with a larger hopper to mill your grain more efficiently. Some mills come with large-capacity hoppers that can hold as much as eleven pounds of grain.
Over the years, the growing demand for homebrew grain mills has led to a wide variety of different models to choose from. While most use the two-roller concept, other designs include Victoria Mills, single roller mills, and multi-roller mills. The Victoria (or Corona) Mill uses two rotating plates to rush the grain. It is generally the least expensive mill to purchase, but can result in a lot of powdering of the husk as they are primarily used for milling flour. Single roller mills use a single roller held close to a flat, fixed plate to produce a better crush, but it still results in some powdering of the husk. Two rollers provide the best crush for homebrewers because they do a great job of crushing the interior of the grain while leaving the husks largely intact when adjusted properly.
Motorize the Mill
After you wear out your arm milling a large quantity of grain using a hand-operated mill, you will probably be eager to find a way to motorize it. Most drills with 3/8" chucks can be easily motorized by removing the hand crank from the drive roller and putting an electric drill on the drive roller axle. However, there are a few additional details to consider first to avoid damaging the mill - or yourself.
The most important thing to remember is that malt may contain some debris like small stones that can get caught in your mill. When this happens, either the debris gets crushed, some part of the mill breaks, or the mill shuts down completely. With industrial equipment where heavy rotating components are mounted on shafts, the two are usually keyed together with a soft metal pin. If the shaft is locked up, the rotating components shear the pin and continue to turn instead of breaking the shaft.
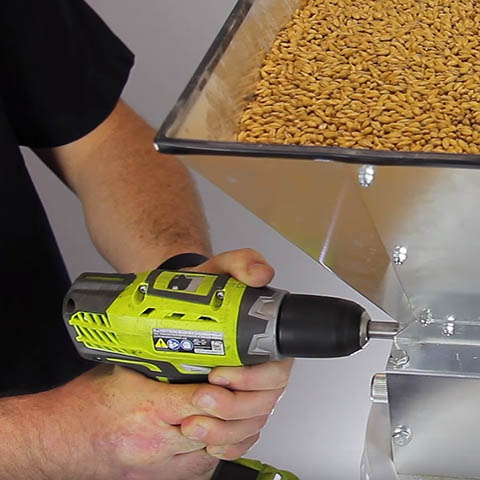
If your drive roller has a cylindrical shaft, you can wrap a strip of paper over the drive roller shaft and then put the wrapped shaft in the drill chuck in order to mimic the shear pin. The chuck should be tightened by hand, not by wrench, enough that the mill can be turned when it's fully loaded. If the mill is locked up, the drill chuck will slip on the roller shaft. This method will not work if the shaft is hexagonal or has flat areas.
Safety First!
When adding motors, electricity, and power tools to your brewing process, you should always make safety your top priority. Motorized grain mills left plugged in at bucket height can be a major hazard, and fingers and clothing can easily become caught in gear-driven machinery. Pay careful attention when using a motorized mill around water.
There is a large range of available torque in electric drills, and some expensive industrial drills can produce enough torque to cause serious injury if they are brought to a sudden stop. It is important to always keep a good grip when using a hand drill to motorize your grain mill.
If you are going to mill your grain in bulk using a powered mill, you may generate a large amount of grain dust. Not only can uncontrolled dust contaminate your beer, but it can also be a serious explosion hazard, so be sure to ventilate the milling area if you're generating a lot of dust and avoid sparks and flames.
Milling Your Own Grain
When setting up your mill, you will want to place it as far away as possible from where you'll be chilling and fermenting your wort. Grain dust is rich in bacteria that can easily contaminate your beer. Grain mills should be mounted in a convenient location, and are generally designed to sit on top of a plastic bucket or be clamped to a workbench. A sturdy set-up that allows for one-handed operation is ideal.
If you will be purchasing enough grain for several batches and milling it as needed, you may need to purchase scales to weigh it out at home. Another option is to use emptied coffee cans to measure your large grain bills by volume. Fill the container with grain and weigh the contents using a scale, then mark the weight capacity on the can. Grain weight changes based on moisture content, so measuring by volume can more accurately ensure consistent grain quantity from batch to batch.
After measuring, pour the grain into the mill hopper. Turn on your motorized mill or start cranking the handle. Start slow to get the grain flowing through the mill and increase speed as you go. Try to only mill as much grain as you're going to use. Like coffee beans, the grain will stay fresher longer if it has not been milled. Seal any remaining crushed grain in a large plastic food storage bucket until the next time you use it.
Once you have enjoyed the savings that come with buying in bulk and milling your own grain, you will never want to go back!