 Single Faucet Kegerator Beer Dispensers
 Dual Faucet Two Tap Kegerators
 Triple Faucet Three Tap Kegerators
 Undercounter Built-In Kegerators
 Outdoor Kegerator Beer Dispensers
 Commercial Kegerators
 Mini Kegerators
 Cold Brew & Nitro Coffee Dispenser Kegerators
 Carbonated Water Kegerators
 Home Brew Kegerators
 15" Kegerators
 Kombucha Equipment
 Guinness® Dispensing Kegerators
 Vending Kegerators
 Wine Kegerators
 Kegerator Cabinets
 Kegerator Covers and Accessories
 Kegerators
 Kegerator Conversion Kits
 Kegs & Keg Accessories
 Beer Faucets
 Beer Shanks
 Draft Beer Towers
 Keg Taps Couplers
 Regulators & Gas Equipment
 Beer & Gas Line Hose
 Co2 and Nitrogen Air Tanks
 Beer Line Cleaning Equipment
 Drip Trays
 System Fittings
 Jockey Boxes
 Keg Beer Party Pumps
 Glassware & Accessories
 Guinness® Dispensing Equipment
 Remote Glycol Systems
 Wine Cooler Refrigerators
 Wine Cellar Cabinets
 Wine Racks
 Cooling Units
 Wine Dispensing Systems
 Wine Glasses
 Wine Accessories
 Howard Miller Wine & Spirits Furniture
 Wine Making
 Nitro Hot Draft System
 Ready to Drink Bag-in-a-Box Coffee Dispensing Equipment
 Nitrogen Infusers
 Nitrogen Beer Regulators
 Nitrogen Tanks & Generators
 Nitro Cold Brew Coffee Kegs
 Cold Brewed Coffee Tools
 Espresso Machines
 Cleaning Equipment
 Outdoor Appliances
 ADA Appliances
 Panel Ready Appliances
 Commercial Grade Appliances
 Beverage Centers
 Refrigerators
 Ice Makers
 Water Dispensers & Accessories
 Freezers
 Blenders & Juicers
 Home Brew Equipment Kits
 Fermentation Equipment
 Boiling and Mashing Equipment
 Home Brew Beer Kegs
 Home Brew Kegerator Conversion Kits
 Brewing Tools
 Home Brew Ingredients
 Cleaning Chemicals
 Test Equipment
 Home Brew Beer Bottles and Bottling Equipment
 Brewery Fittings
 Draft Beer Equipment
 Homebrewing Equipment
 Wine Equipment
 Luxury Appliances and Refrigeration
 Coffee Equipment
 Home Bar & Barware
 Kombucha
 The Beverage Blog
 Frequently Asked Beer Questions
 Shop by Brand
 Shop by Category
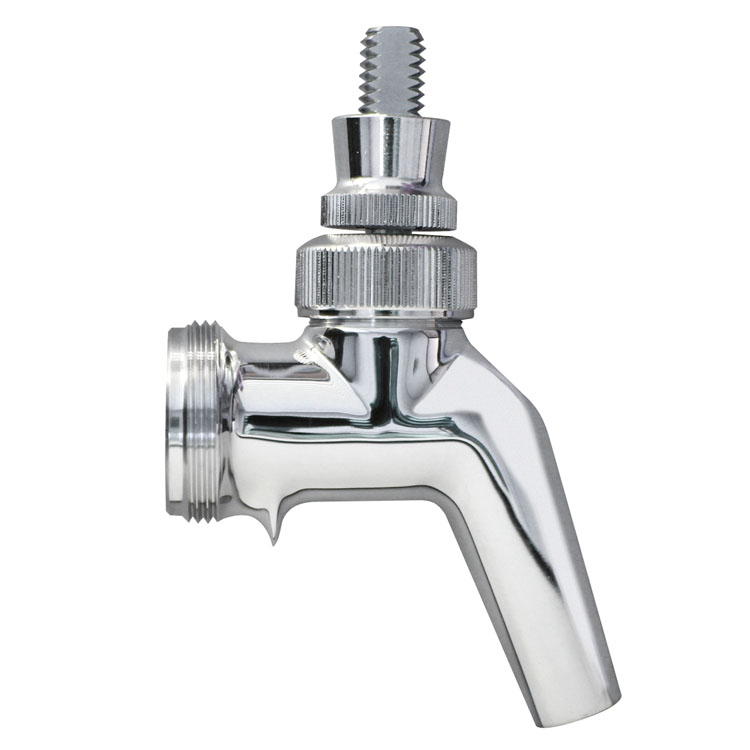


Perlick PERL Keg Beer Creamer Faucet - Stainless Steel
Model: 680SS
- This Perlick 680SS Forward Sealing Faucet features a fingertip push back control that adds just the right amount of head
- Patented forward sealing design eliminates the need for a valve shaft exposed to beer and air
- This NSF-approved faucet has a stainless steel construction that will not pit or tarnish
- Spout angle is more vertical, allowing a more thorough draining after each pour and no horizontal area for beer to collect
- Polished interior ensures a smooth flow with less agitation and less foaming
This Perlick 680SS Push-Back Creamer Faucet enables the operator to pour the precise amount of foam every time. Pushing the handle back moves a stainless steel piston, which exposes small holes. The turbulence created by beer passing through the holes produces a creamy head.
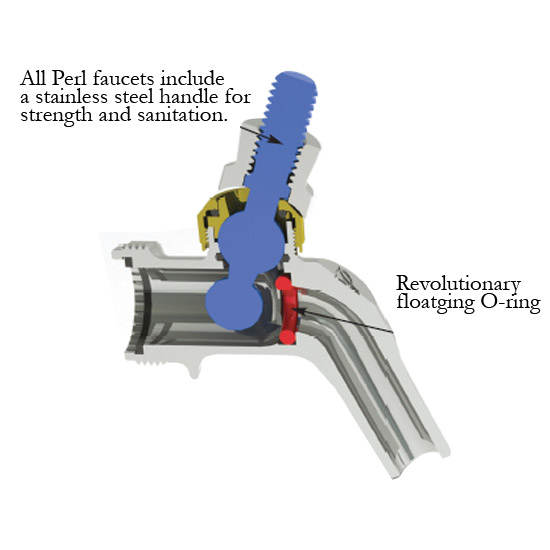
Thanks to its stainless steel construction, this NSF-approved faucet will not pit or tarnish. It features a revolutionary ball and floating front seal design that prevents beer from being exposed to air, so the handle lever won't stick and there will be no build up of mold and bacteria in the faucet body. The spout angle is more vertical on this faucet to allow for a more thorough draining after each pour, so there is no horizontal area for beer to collect. It also has fewer internal parts, resulting in better reliability and fewer service calls.
- All Perl faucets include a stainless steel lever for strength and sanitation.
- Forward seat design to prevent lever from sticking
- More sanitary than rear seating faucets
- 1"W x 4"H x 2 3/4"D

| Faucet Replacement Parts | |||||
|---|---|---|---|---|---|
| Item | 630 | 680 | 650 | 690 | Description |
| 1 | 67829-1 | 67829-1 | 67829-1 | 67829-1 | Handle Jacket, Chrome |
| 67829-1TF | 67829-1TF | N/A | N/A | Handle Jacket, Tarnish Free | |
| 2 | 67820-1 | 67820-1 | 67820-1 | 67820-1 | Compression Bonnet, Chrome |
| 67820-1TF | 67820-1TF | N/A | N/A | Compression Bonnet, Tarnish Free | |
| 3 | 67828-1 | 67828-1 | 67828-1 | 67828-1 | O-Ring, Compression |
| 4 | 67819-2 | 67819-2 | 67819-2 | 67819-2 | Bearing Cup |
| 5A | 68726-1 | N/A | 68626-1 | N/A | Handle Lever |
| 5B | N/A | 68810 | N/A | 68810 | Handle Lever, Push Back Creamer |
| 6 | 67830-1 | 67830-1 | 67830-1 | 67830-1 | O-Ring, Pivot Ball |
| 7 | 67933-1 | 67933-1 | 67933-1 | 67933-1 | O-Ring, Front Seat |
| 8 | 308-3-2P | 308-3-2P | 308-3-2P | 308-3-2P | Coupling Gasket |
| 9 | N/A | N/A | 68206-1 | 68206-1 | Flow Control: Compensator |
| 10 | N/A | N/A | 67989SK | 67989SK | Flow Control: Seal Kit |
| 11 | N/A | N/A | 67989LK | 67989LK | Flow Control: Lever & Seal Kit |
Follow these instructions if you need to take the faucet apart to replace worn parts.
Note: Anytime the Front Seat (I), O-ring (H) or Coupling Gasket(s) are removed, they should be replaced. Always use OEM replacement parts.
TO DISASSEMBLE:
- If faucet is USED, soak faucet in warm cleaning solution for 1-2 minutes to free up bonnet and handle jacket. If the faucet is NEW, submerge the faucet in warm water for 5 seconds.
- Unscrew and remove Jacket (1).
- Unscrew and remove Compression Bonnet (2).
- Remove Coupling Gasket (8) only if cut or worn.
- To remove the Handle Lever Assembly (5A or 5B), lift it upward and push back.
- To remove Front Seat (7) use a small screwdriver from the bonnet end of the faucet.
- To remove O-ring (6) use a small screwdriver from the bonnet end of the faucet.
- Inspect O-rings for wear or damage and replace as necessary.
- To remove flow control lever, unscrew cap and pull out.
- Remove flow control compensator from rear of faucet.
TO ASSEMBLE:
- Re-install O-ring (6) into O-ring groove from bonnet end (use a small blunt screwdriver).
- Re-install front Seat (7) into O-ring groove (use a small blunt screwdriver). Note: Seat must move freely in seat groove.
- Re-install Handle Lever Assembly (5A or 5B).
- Re-install Bearing Cup (4).
- Re-install Bonnet Washer (3) into Compression Bonnet (2).
- Re-install Compression Bonnet (2). Tighten by hand only. Do not use any tool, as this can damage the faucet.
- Re-install Handle Jacket (1).
- Re-install Coupling Gasket (8) if removed.
- Install flow control compensator into rear of faucet and orientate so level engagement hole is facing lever insertion hole.
- Install flow control lever, ensure pin on end of lever is aligned with compensator engagement hole and tighten cap.
05/14/2015
great product RnRSpout works smoothly every time.No more stuck faucrt
05/12/2015
Product is fine, service not, shpg slow billrLove the Perlicks. Submitted a support inquiry 4 days ago (different item), still waiting for a reply. Finally, I forgot beveragefactory was on the Left Coast - shipping takes forever.
04/23/2015
Solves a big problem PeteI didn't realize how much I needed these until I got two. My old faucets would stick with sweeter or thicker beers. It made me mental. These do not stick at all so far. My only grip is that with bigger heaver tap handles, they tend to be very easy to move, so a strong breeze might cause the tap to open (slight exaggeration, just don't bump one and not double check). They make my taps much easier to use.
02/11/2015
Worth the money KyleReplaced old faucet (non-Perlick sytle) with this Perlick faucet and I can't believe the results. Haven't had to worry about foaming at the begining of a pour and it is super easy to open and close.
Be the first to ask a question.
06/30/2015
Superbly engineered
Cudahy GuyI love the positive feel of the faucet. When I close it, it closes. My old faucets are showing a little wear; a little bit of beer seeps into the valve which turns gummy, nasty, sticky, and is a mold/bacteria trap. Stainless steel, not plated brass, hygienic, easy to clean. As an engineer, I appreciate the clever design and the fit and finish feel great in the hand.